Stop Wasting Money on Virtual Servers
Networking Basics
- IP Addresses
- DNS
- Ports
- NAT
- VPN
- Reverse Proxies
IP (Internet Protocol) Addresses
Numeric labels used to identify devices on a network. For example 192.168.1.2
- Anytime data is sent on the network it's to an IP Address
- Not tightly coupled to the device
- Can be reassigned to a different device
DNS (Domain Name System)
A system that allows computers to convert human friendly names (e.g. sgf.dev) into an IP address
Essentially the phonebook of a network
Types: A, CNAME
Ports
Used to identify a specific protocol or application to communicate with
Some common protocols
and ports
- HTTP - 80
- HTTPS - 443
- SSH - 20
Senders specify a reply port when sending packets
NAT (Network Address Translation)
Allows a network to share an IP when communicating with another network
Rewrites outgoing packets to use the shared address + a unique port for the reply address
Uses a table of those rewrites to do the inverse for incoming packets
Port Forwarding
Allows incoming traffic on a port to be forwarded to a specific device on the network
- Needs to be supported by your NAT device (router)
- Your ISP may explicitly block this feature
- Your ISP may give your NAT device a different IP at any time
Dynamic DNS
Uses an agent on a device in your network to detect public IP changes
When a change is detected, it dynamically updates a DNS record
Why Is This Naive?
- May be blocked by your ISP
- Exposes your home IP to the public
- This can be mitigated with something like Cloudflare
- Is likely against your ISPs TOS
- And could be trivially detected
Proxy
A server that forwards traffic from a client on to a destination
Hides the true client from the server
Reverse Proxy
A server that takes incoming traffic and forwards it to another server
Hides the true server from the client
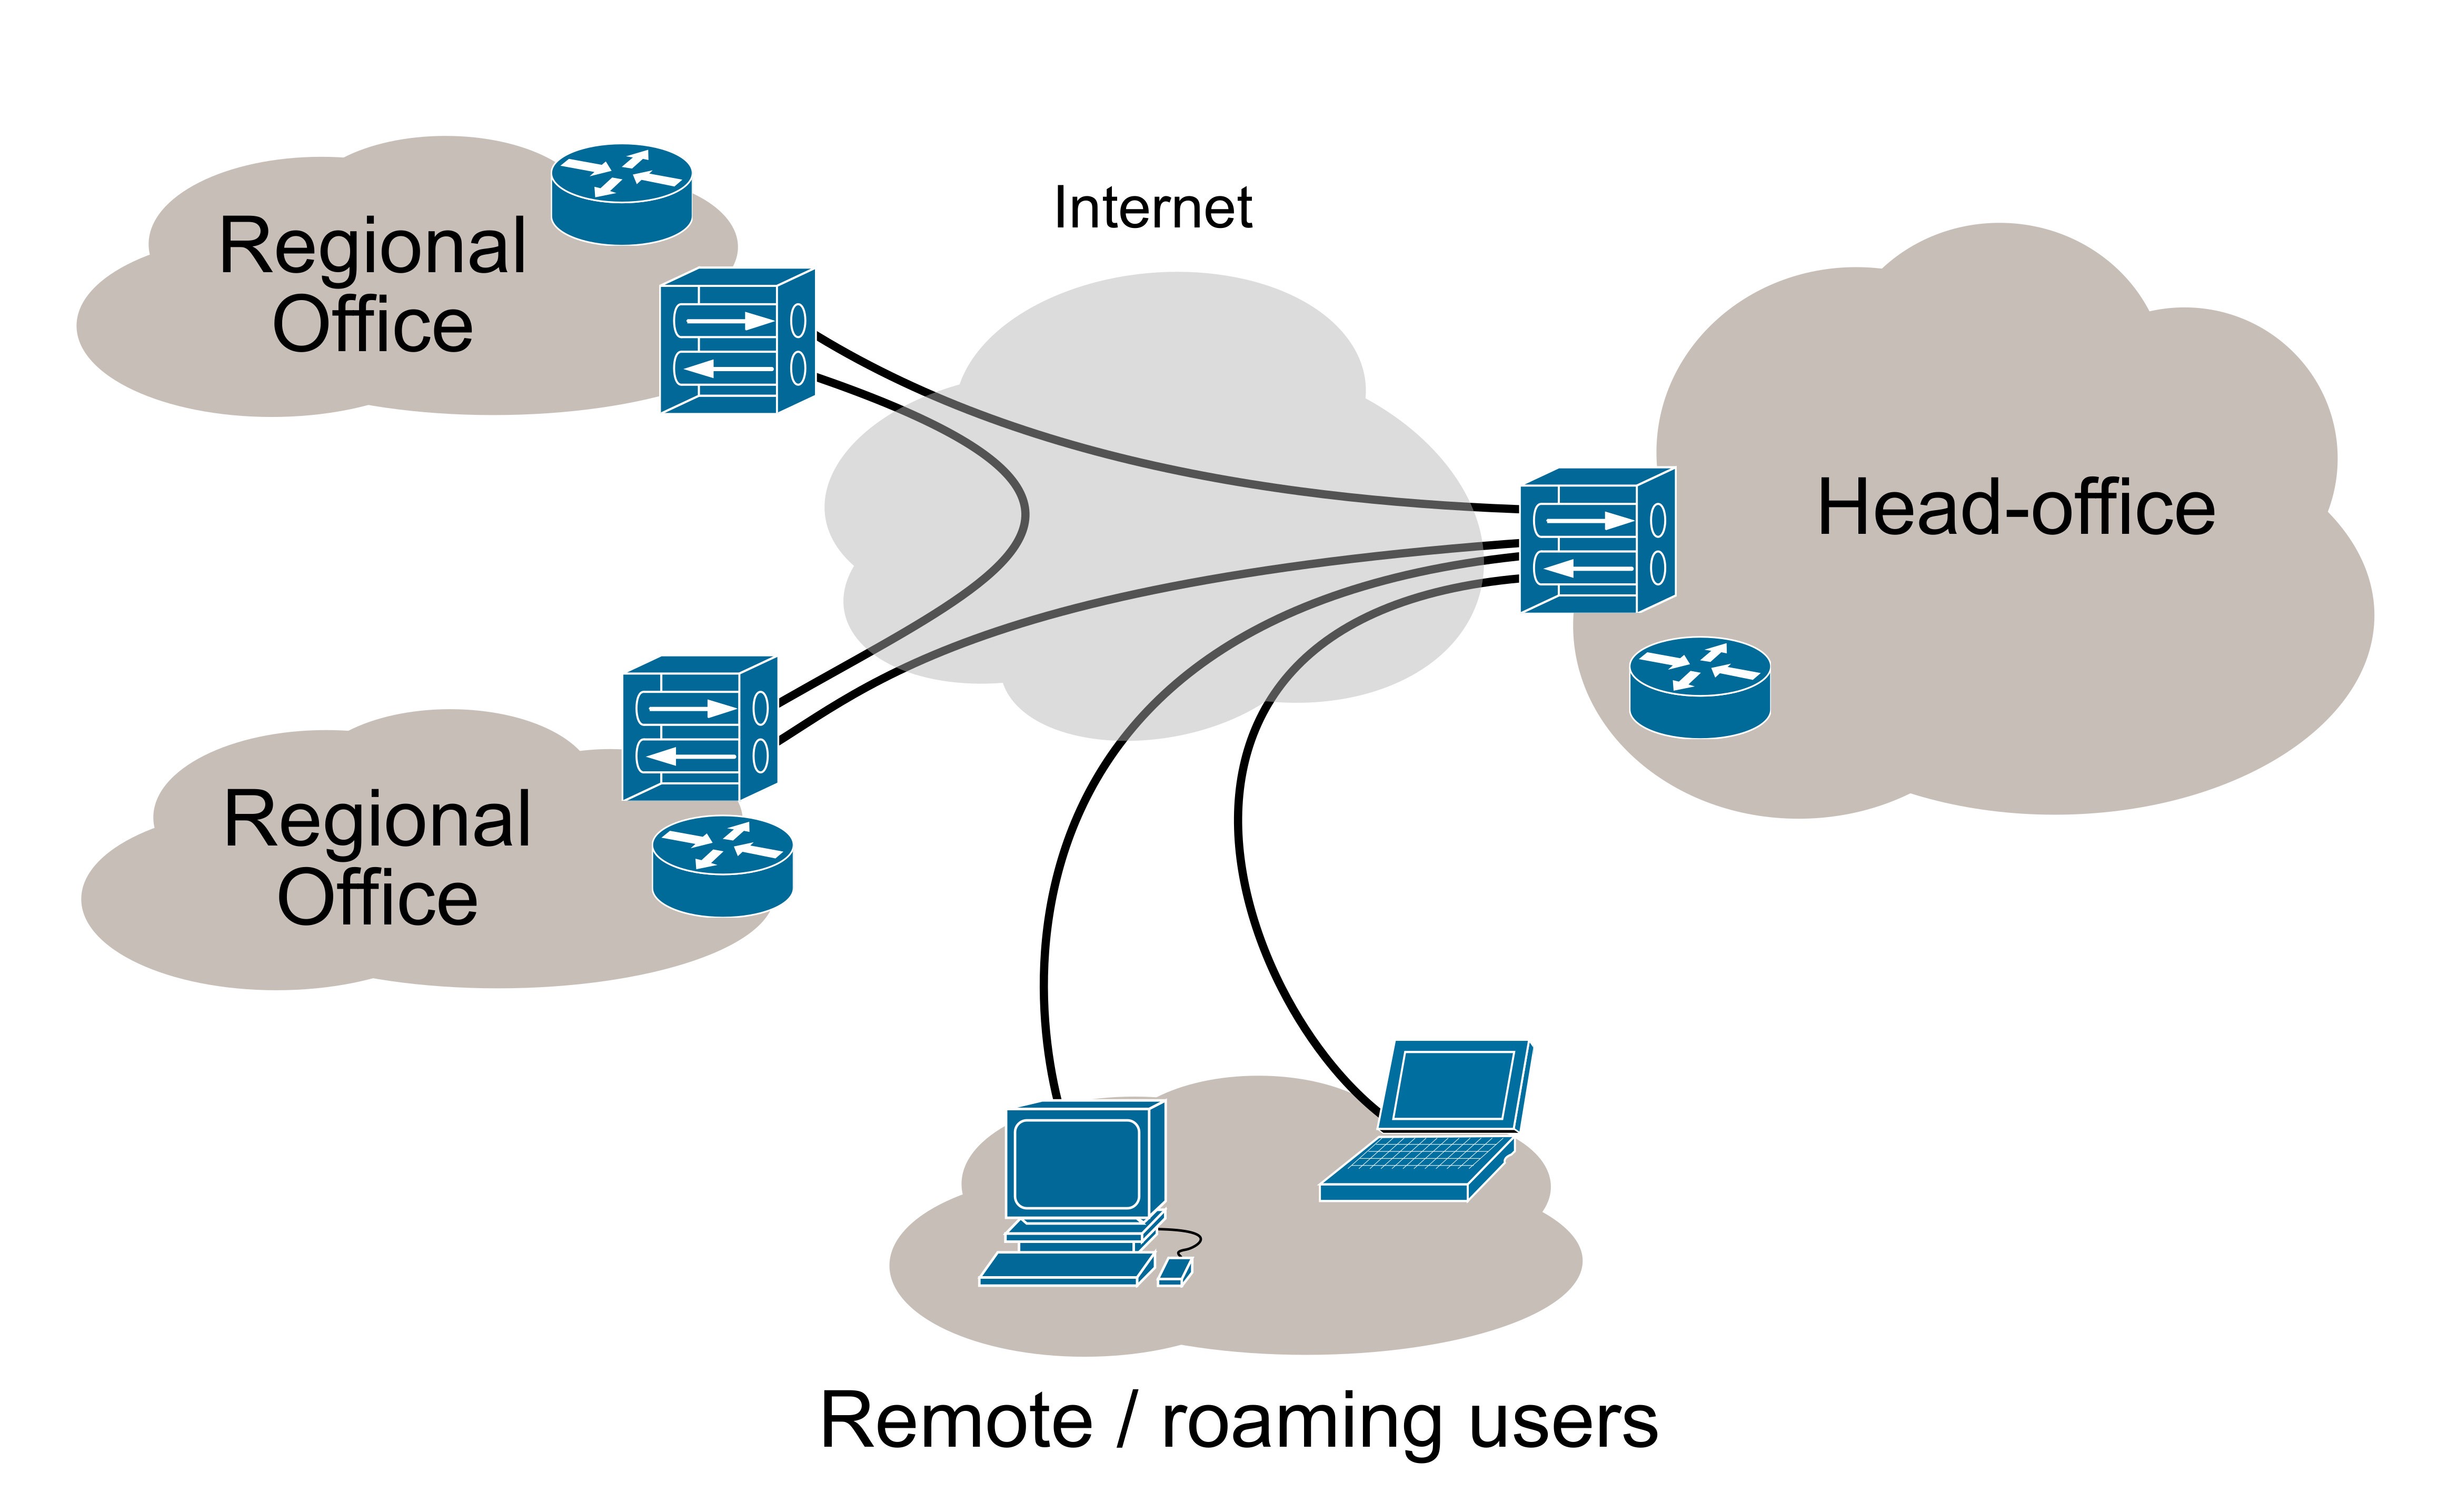
VPN (Virtual Private Network)
Creates a secure tunnel to a VPN server that all traffic flows to first
In practice this means
- Packets are encrypted on device
- They are then sent to the VPN server
- The VPN server decrypts the packets
- And then forwards them on to real destination
VPN Part 2
Allows machines physically apart to be on the same "virtual" network
So What's the Better Way?
Well... you cheat a bit
You pay for a virtual server
What Kind of Server?
- Physically close with low latency
- Most hosting companies have a "looking glass" tool for testing
- Low spec and cheap
- Includes IPV4
Server Setup
| sudo apt install wireguard |
| |
| |
| sudo ufw allow 51820/udp |
| sudo ufw enable |
| |
| sudo su |
| cd /etc/wireguard |
| wg genkey | tee privatekey | wg pubkey > publickey |
| |
| vim ./wg0.conf |
| sudo apt install wireguard |
| |
| |
| sudo ufw allow 51820/udp |
| sudo ufw enable |
| |
| sudo su |
| cd /etc/wireguard |
| wg genkey | tee privatekey | wg pubkey > publickey |
| |
| vim ./wg0.conf |
| sudo apt install wireguard |
| |
| |
| sudo ufw allow 51820/udp |
| sudo ufw enable |
| |
| sudo su |
| cd /etc/wireguard |
| wg genkey | tee privatekey | wg pubkey > publickey |
| |
| vim ./wg0.conf |
| sudo apt install wireguard |
| |
| |
| sudo ufw allow 51820/udp |
| sudo ufw enable |
| |
| sudo su |
| cd /etc/wireguard |
| wg genkey | tee privatekey | wg pubkey > publickey |
| |
| vim ./wg0.conf |
Server Setup Part 2
| [Interface] |
| Address = 10.0.0.x/24 |
| SaveConfig = true |
| PostUp = iptables -A FORWARD -i %i -j ACCEPT |
| PostDown = iptables -D FORWARD -i %i -j ACCEPT |
| ListenPort = 51820 |
| PrivateKey = <generated private key> |
| [Interface] |
| Address = 10.0.0.x/24 |
| SaveConfig = true |
| PostUp = iptables -A FORWARD -i %i -j ACCEPT |
| PostDown = iptables -D FORWARD -i %i -j ACCEPT |
| ListenPort = 51820 |
| PrivateKey = <generated private key> |
| [Interface] |
| Address = 10.0.0.x/24 |
| SaveConfig = true |
| PostUp = iptables -A FORWARD -i %i -j ACCEPT |
| PostDown = iptables -D FORWARD -i %i -j ACCEPT |
| ListenPort = 51820 |
| PrivateKey = <generated private key> |
| [Interface] |
| Address = 10.0.0.x/24 |
| SaveConfig = true |
| PostUp = iptables -A FORWARD -i %i -j ACCEPT |
| PostDown = iptables -D FORWARD -i %i -j ACCEPT |
| ListenPort = 51820 |
| PrivateKey = <generated private key> |
| exit |
| sudo systemctl enable wg-quick@wg0 |
| sudo systemctl start wg-quick@wg0 |
Client Setup
| sudo apt install wireguard |
| |
| sudo su |
| cd /etc/wireguard |
| wg genkey | tee privatekey | wg pubkey > publickey |
| |
| vim ./wg0.conf |
| sudo apt install wireguard |
| |
| sudo su |
| cd /etc/wireguard |
| wg genkey | tee privatekey | wg pubkey > publickey |
| |
| vim ./wg0.conf |
| sudo apt install wireguard |
| |
| sudo su |
| cd /etc/wireguard |
| wg genkey | tee privatekey | wg pubkey > publickey |
| |
| vim ./wg0.conf |
Client Setup Part 2
| [Interface] |
| PrivateKey = <generated client private key> |
| Address = 10.0.0.x/24 |
| DNS = 1.1.1.1 |
| |
| [Peer] |
| PublicKey = <server public key> |
| AllowedIPs = 0.0.0.0/0 |
| Endpoint = <server ip>:51820 |
| PersistentKeepalive = 10 |
| [Interface] |
| PrivateKey = <generated client private key> |
| Address = 10.0.0.x/24 |
| DNS = 1.1.1.1 |
| |
| [Peer] |
| PublicKey = <server public key> |
| AllowedIPs = 0.0.0.0/0 |
| Endpoint = <server ip>:51820 |
| PersistentKeepalive = 10 |
| [Interface] |
| PrivateKey = <generated client private key> |
| Address = 10.0.0.x/24 |
| DNS = 1.1.1.1 |
| |
| [Peer] |
| PublicKey = <server public key> |
| AllowedIPs = 0.0.0.0/0 |
| Endpoint = <server ip>:51820 |
| PersistentKeepalive = 10 |
| [Interface] |
| PrivateKey = <generated client private key> |
| Address = 10.0.0.x/24 |
| DNS = 1.1.1.1 |
| |
| [Peer] |
| PublicKey = <server public key> |
| AllowedIPs = 0.0.0.0/0 |
| Endpoint = <server ip>:51820 |
| PersistentKeepalive = 10 |
| [Interface] |
| PrivateKey = <generated client private key> |
| Address = 10.0.0.x/24 |
| DNS = 1.1.1.1 |
| |
| [Peer] |
| PublicKey = <server public key> |
| AllowedIPs = 0.0.0.0/0 |
| Endpoint = <server ip>:51820 |
| PersistentKeepalive = 10 |
| [Interface] |
| PrivateKey = <generated client private key> |
| Address = 10.0.0.x/24 |
| DNS = 1.1.1.1 |
| |
| [Peer] |
| PublicKey = <server public key> |
| AllowedIPs = 0.0.0.0/0 |
| Endpoint = <server ip>:51820 |
| PersistentKeepalive = 10 |
| exit |
| sudo systemctl enable wg-quick@wg0 |
| sudo systemctl start wg-quick@wg0 |
Register Client with Server
| sudo systemctl stop wg-quick@wg0 |
| sudo vim /etc/wireguard/wg0.conf |
| [Peer] |
| PublicKey = <client public key> |
| AllowedIPs = 10.0.0.x/32 |
| [Peer] |
| PublicKey = <client public key> |
| AllowedIPs = 10.0.0.x/32 |
| [Peer] |
| PublicKey = <client public key> |
| AllowedIPs = 10.0.0.x/32 |
| sudo systemctl start wg-quick@wg0 |
Docker
Essentially provides lightweight virtual machines* called containers
*they're definitely not virtual machines but it's easier to describe that way
**if this description upsets you sorry not sorry 😎
These containers can be easily created and destroyed using the docker cli
Containers also typically have all their dependencies included
Docker Compose
Allows you to spin up many containers at once using a config file
For example creating a web app and it's database at the same time
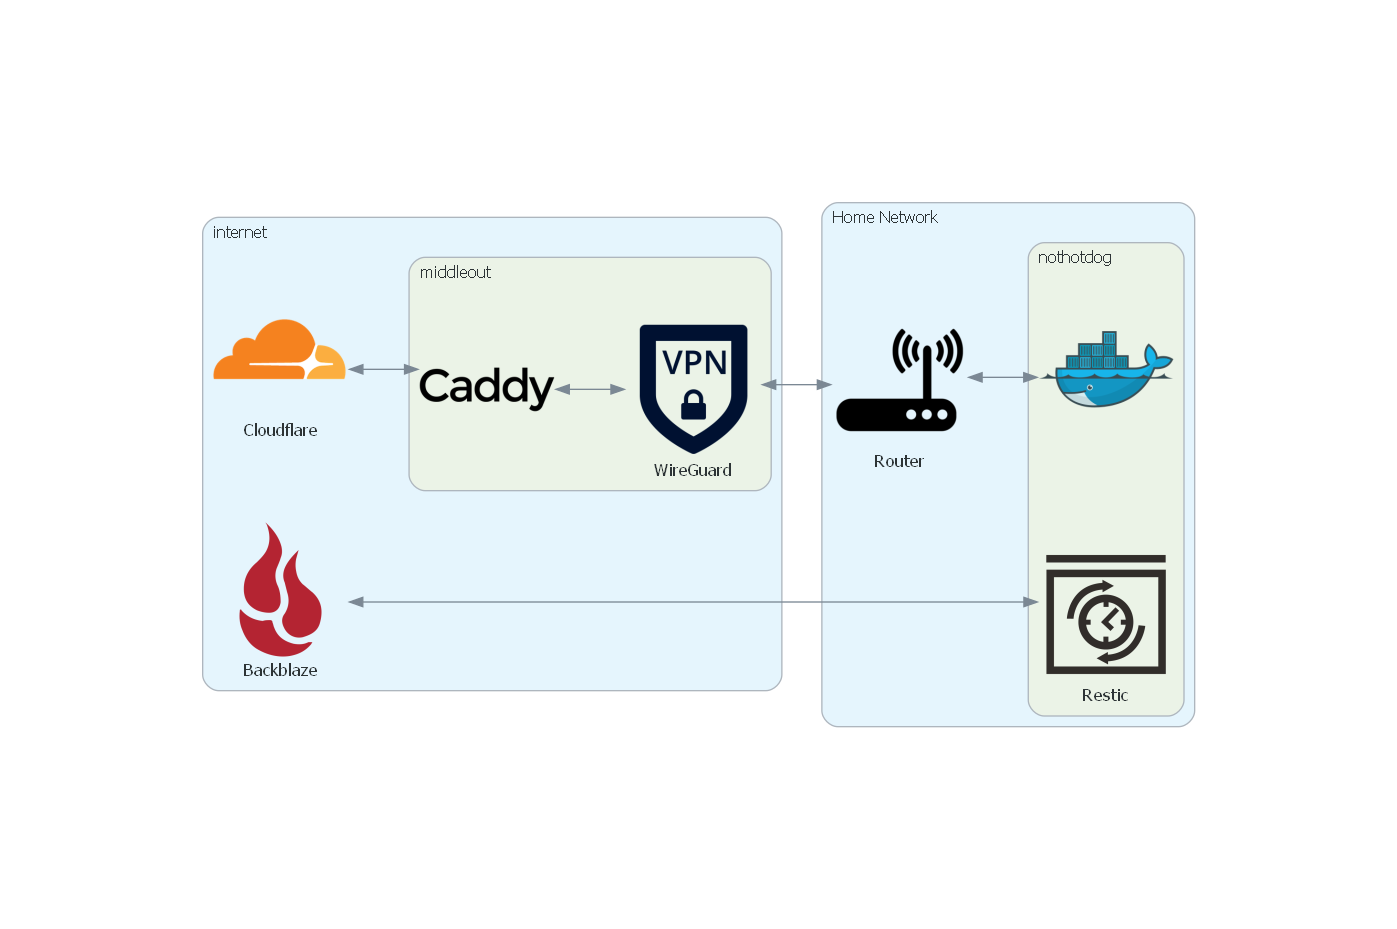
What Is It?
Caddy is a very easy to use reverse proxy server
Has comparable features to others such as Nginx or HaProxy
It can seamlessly generate SSL certificates and keep them updated
Caddy Setup (Docker Compose)
| services: |
| reverse-proxy: |
| image: caddy:latest |
| restart: always |
| ports: |
| - "80:80" |
| - "443:443" |
| - "443:443/udp" |
| - "2019:2019" |
| volumes: |
| - ./Caddyfile:/etc/caddy/Caddyfile |
| - caddy_data:/data |
| - caddy_config:/config |
| |
| volumes: |
| caddy_data: |
| caddy_config: |
Caddy Setup (Caddyfile)
| https://social.sgf.dev { |
| reverse_proxy 10.0.0.3:9000 |
| } |
| https://social.sgf.dev { |
| reverse_proxy 10.0.0.3:9000 |
| } |
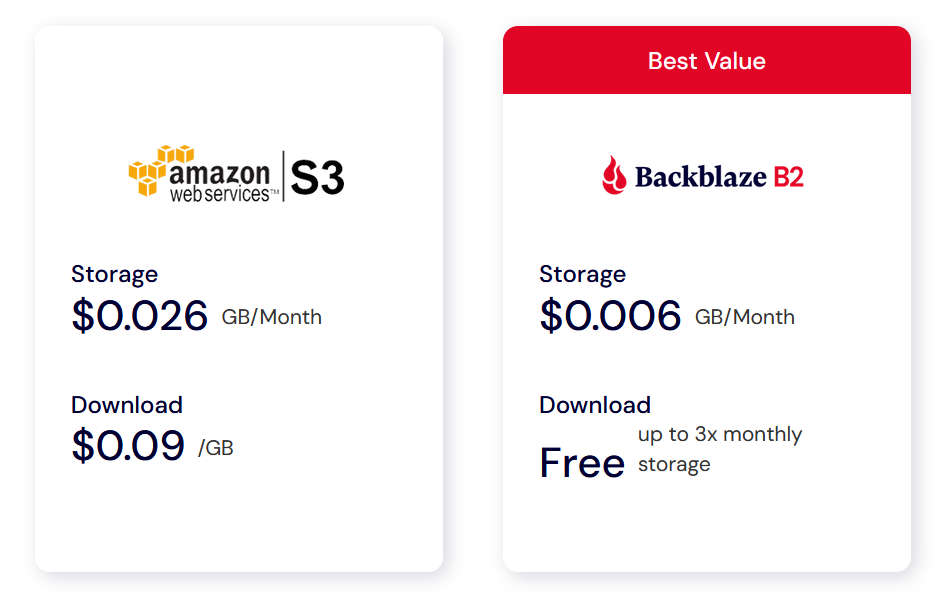
Backblaze
Provides very cheap S3 compatible storage. Excellent for storing backups
Restic
A tool for creating and uploading backups to a remote location. It supports:
- Incremental backups with data deduplication
- Restore to any snapshot
- Encrypting your backups at rest
- Several backends to upload backups to
Restic Part 2
Supports a variety of remote locations
- SFTP
- REST Server
- AWS S3
- And S3 compatible vendors (like Backblaze)
- Azure Blob Storage
- Google Cloud Storage
- Many others using rclone
Restic Usage
| sudo apt install restic |
| |
| export RESTIC_PASSWORD='your_password_here' |
| export AWS_ACCESS_KEY_ID='' |
| export AWS_SECRET_ACCESS_KEY='' |
| |
| restic -r s3:<backblaze url> init |
| |
| restic -r s3:<backblaze url> backup ./<some folder> |
| |
| restic -r s3:<backblaze url> restore latest --target ./ |
Things You Probably Shouldn't Self Host
- Email servers
- Anything touching payments
- Game servers
- Most real world things
Disclaimers
- This was not legal advice
- Don't blame me if your ISP shuts you down
- Putting things on the internet is always risky
- Plan accordingly
- E.g. tighten your home networks security


%20rotate(45)'%3e%3cline%20id='Line_38'%20data-name='Line%2038'%20x2='23.314'%20y2='23.314'%20transform='translate(106.5%20402.5)'%20fill='none'%20stroke='%23fff'%20stroke-linecap='round'%20stroke-width='7'/%3e%3cline%20id='Line_39'%20data-name='Line%2039'%20x1='23.314'%20y2='23.314'%20transform='translate(106.5%20402.5)'%20fill='none'%20stroke='%23fff'%20stroke-linecap='round'%20stroke-width='7'/%3e%3c/g%3e%3c/svg%3e)


'%3e%3ccircle%20id='Ellipse_50'%20data-name='Ellipse%2050'%20cx='18.5'%20cy='18.5'%20r='18.5'%20transform='translate(1235%201254)'%20fill='%23fff'/%3e%3cg%20id='Ellipse_49'%20data-name='Ellipse%2049'%20transform='translate(1221%201241)'%20fill='none'%20stroke='%2358a3f2'%20stroke-width='6'%3e%3ccircle%20cx='22'%20cy='22'%20r='22'%20stroke='none'/%3e%3ccircle%20cx='22'%20cy='22'%20r='19'%20fill='none'/%3e%3c/g%3e%3c/g%3e%3c/svg%3e)
%20rotate(132)'%3e%3cg%20id='Group_139'%20data-name='Group%20139'%20transform='translate(1302.705%20279.566)'%3e%3cline%20id='Line_47'%20data-name='Line%2047'%20x1='13.934'%20y2='13.934'%20transform='translate(0%200)'%20fill='none'%20stroke='%23fff'%20stroke-linecap='round'%20stroke-width='5'/%3e%3cline%20id='Line_48'%20data-name='Line%2048'%20x2='13.934'%20y2='13.934'%20transform='translate(0%2013.934)'%20fill='none'%20stroke='%23fff'%20stroke-linecap='round'%20stroke-width='5'/%3e%3c/g%3e%3cg%20id='Group_140'%20data-name='Group%20140'%20transform='translate(1317.066%20279.566)'%3e%3cline%20id='Line_47-2'%20data-name='Line%2047'%20x1='13.934'%20y2='13.934'%20transform='translate(0%200)'%20fill='none'%20stroke='%23fff'%20stroke-linecap='round'%20stroke-width='5'/%3e%3cline%20id='Line_48-2'%20data-name='Line%2048'%20x2='13.934'%20y2='13.934'%20transform='translate(0%2013.934)'%20fill='none'%20stroke='%23fff'%20stroke-linecap='round'%20stroke-width='5'/%3e%3c/g%3e%3c/g%3e%3c/svg%3e)

'%3e%3ccircle%20id='Ellipse_57'%20data-name='Ellipse%2057'%20cx='15.5'%20cy='15.5'%20r='15.5'%20transform='translate(580.485%20794.347)%20rotate(131)'%20fill='%2358a3f2'/%3e%3cg%20id='Ellipse_58'%20data-name='Ellipse%2058'%20transform='translate(595.249%20792.605)%20rotate(131)'%20fill='none'%20stroke='%23fff'%20stroke-width='4'%3e%3ccircle%20cx='18'%20cy='18'%20r='18'%20stroke='none'/%3e%3ccircle%20cx='18'%20cy='18'%20r='16'%20fill='none'/%3e%3c/g%3e%3c/g%3e%3c/svg%3e)
'%3e%3cpath%20id='Path_7'%20data-name='Path%207'%20d='M0-6.967H87.133V681.2h718.05l-72.169,88.635H0Z'%20transform='translate(9.999%201203.407)'%20fill='%23fff'%20stroke='%23fff'%20stroke-width='56'/%3e%3cpath%20id='Path_8'%20data-name='Path%208'%20d='M-8.7,0H1469.661V505.7h-87.524V87.3H-8.7Z'%20transform='translate(243.164%20459.451)'%20fill='%23fff'%20stroke='%23fff'%20stroke-width='56'/%3e%3cpath%20id='Path_10'%20data-name='Path%2010'%20d='M0,85.609,82.932-26.079V542.036H0Z'%20transform='translate(1631.894%201350.975)'%20fill='%23fff'%20stroke='%23fff'%20stroke-width='56'/%3e%3cpath%20id='Path_6'%20data-name='Path%206'%20d='M0,128.744,148.4-38.262V928.774h763.6L541.624,1327.34l112.331-251.426H0Z'%20transform='translate(-0.001%2038.262)'%20fill='%23fff'/%3e%3cpath%20id='Path_9'%20data-name='Path%209'%20d='M381.966-54.467,278.906,183.272H998.832L278.906,1087.232h843.065L947.835,1244.365H-55.977L683.579,327.312H55.774Z'%20transform='translate(798.098%20889.001)'%20fill='%23fff'/%3e%3c/g%3e%3c/svg%3e)